
The Ultimate Guide to Photographing Luxury Watches
Posted by Urs Recher on Sep 22nd 2021
"Oh, no, please not!", is a widely heard statement of photographers, when the subject is WATCH PHOTOGRAPHY.
Personally I love this kind of challenge. Shooting watches is like meditation. There is just a small setup where you move your lights, your diffusers, little mirrors and cardboards. Studio photography at its best.
In a first step, I fix the object's position and the camera's perspective. Then I try out different light sources and analyze their effect on the surfaces. Step by step I start building up my light. Patience and improvisation skills are essential, understanding studio lighting helps a lot, too.
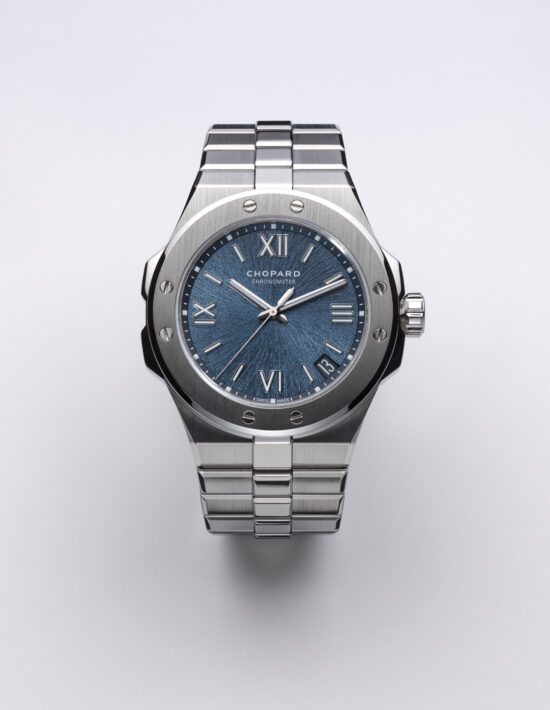
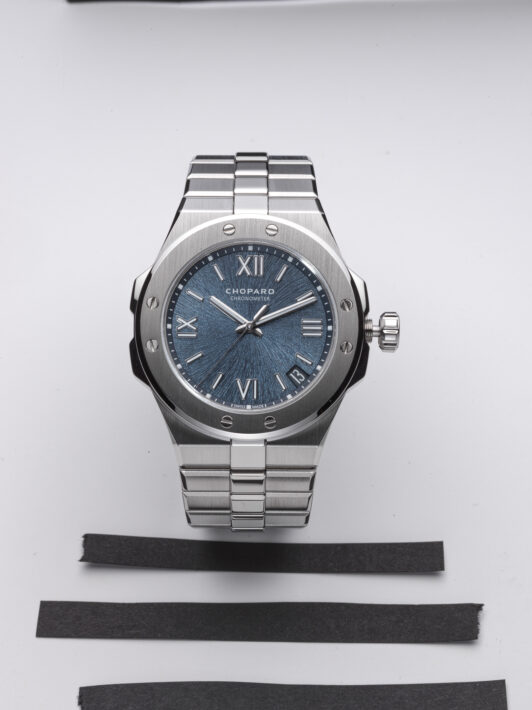
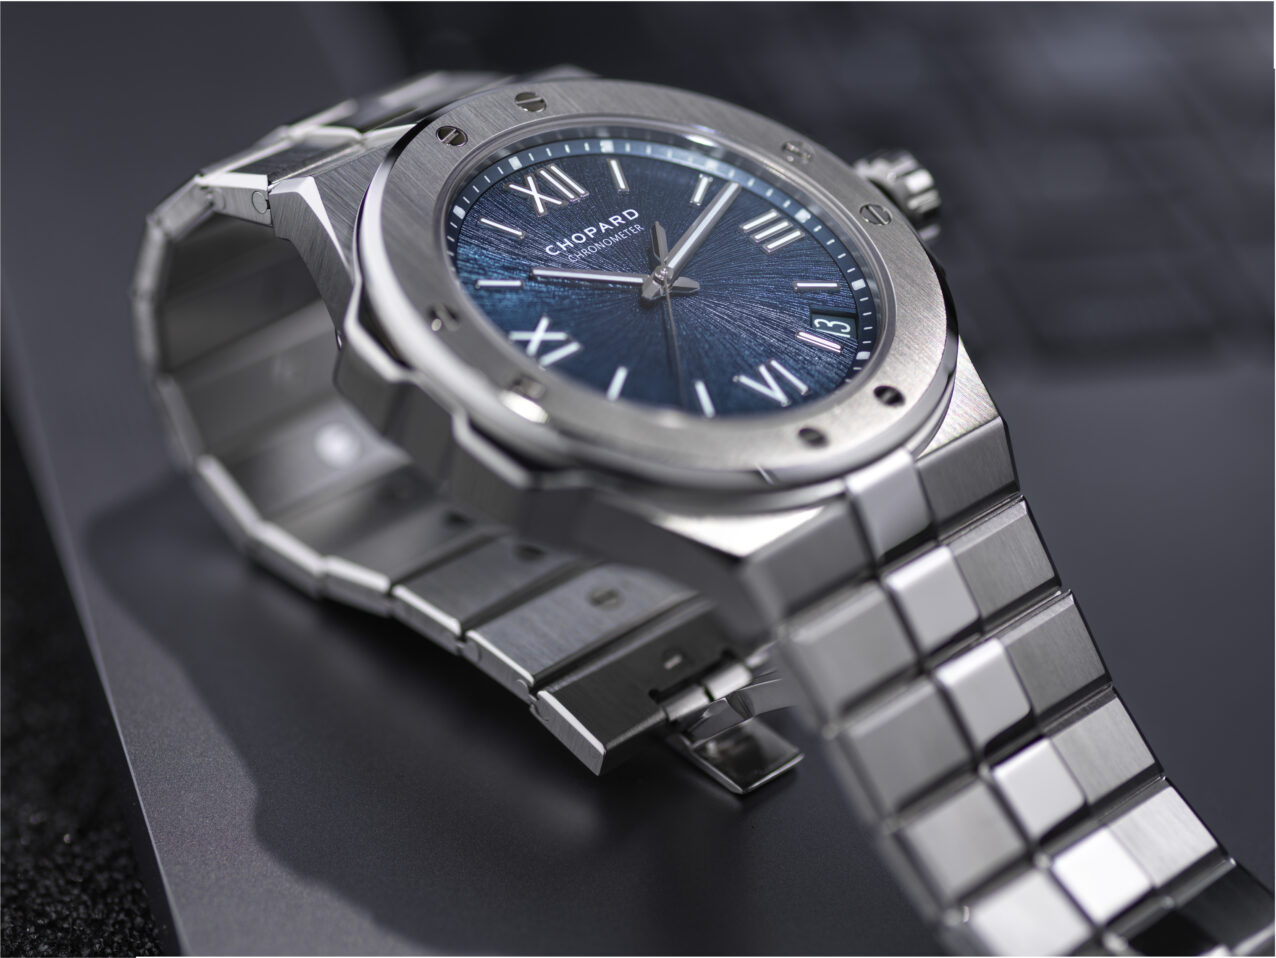
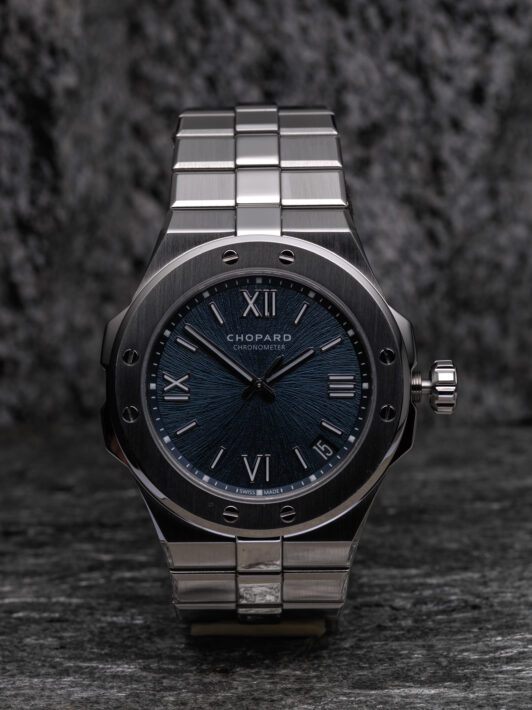
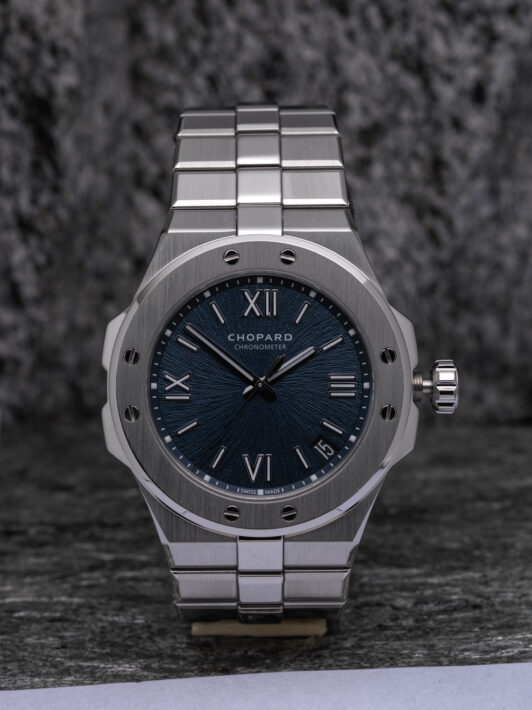
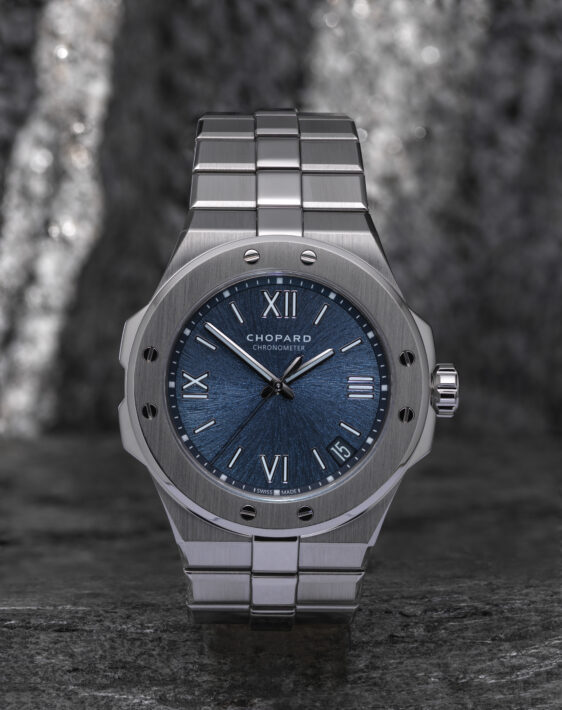
The task was to shoot three photographs of a luxury "CHOPARD ALPINE EAGLE" watch: A straightforward Ecommerce shot on a bright background, not all white with a tiny shadow below the object to attach it to the ground. The second request was an emotional still life with very selective focus and a more creative perspective. The third shot was supposed to be straight on again, but this time with an "interpretation" of the watch's name: alpine eagle. So I decided to shoot it on and in front of some Granit stones from the Swiss Alps.
I started with the Ecommerce photo, expecting this shot to be the easy one…
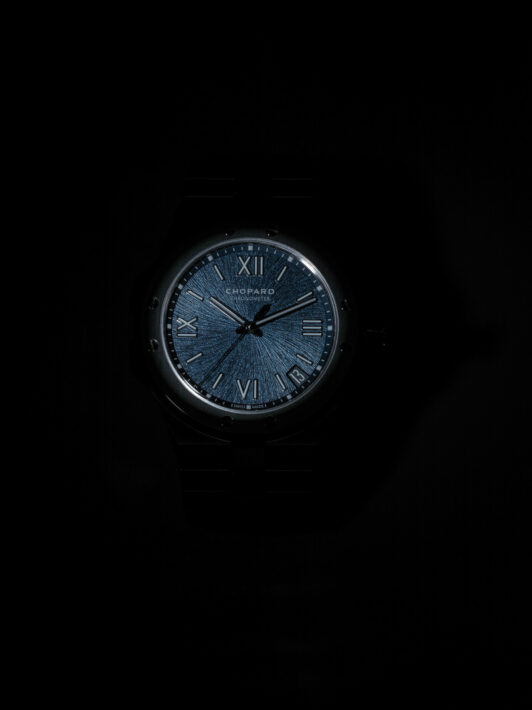
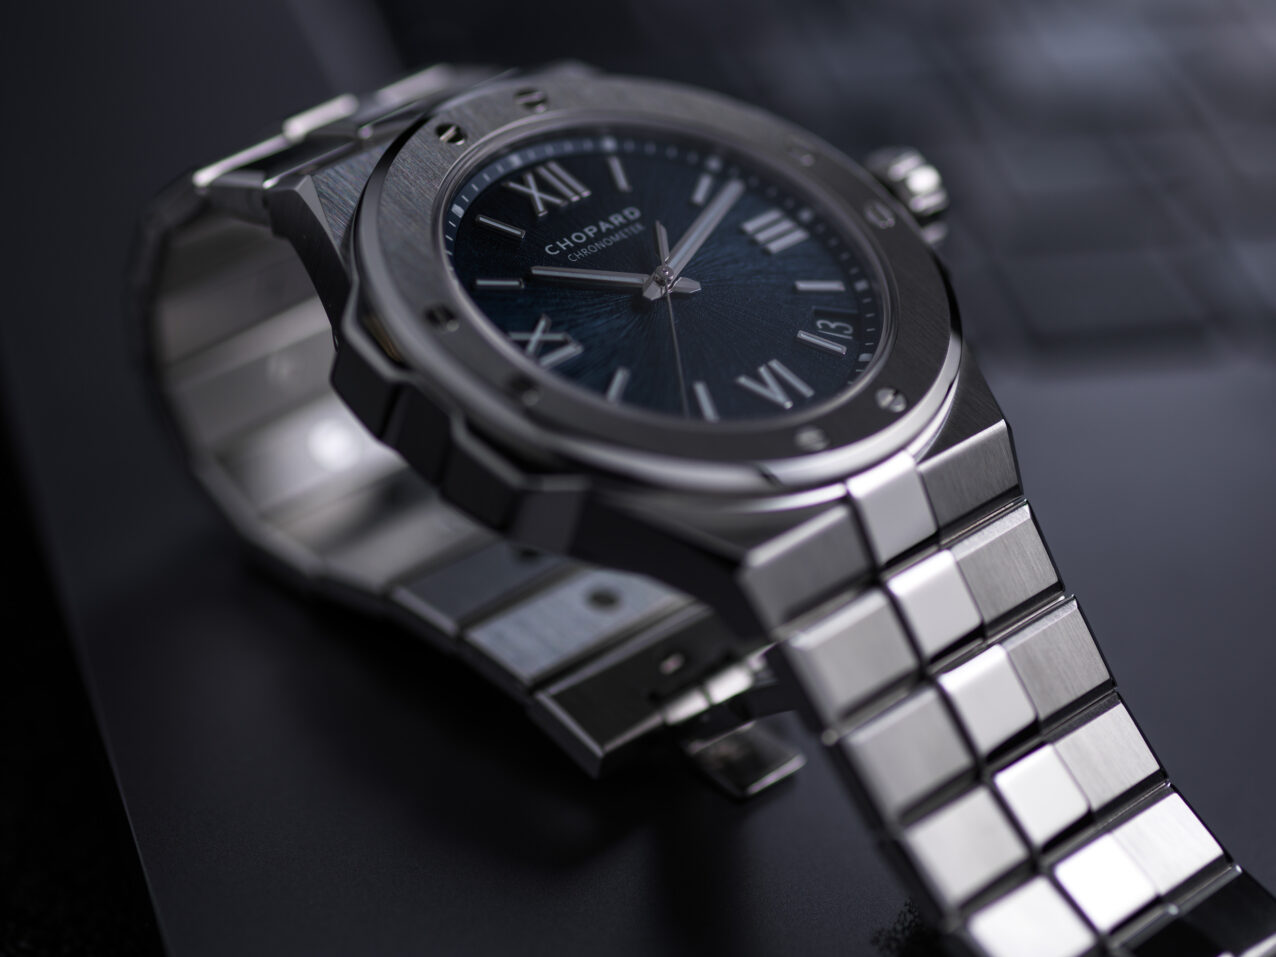
To start, let's have a look at the final result:
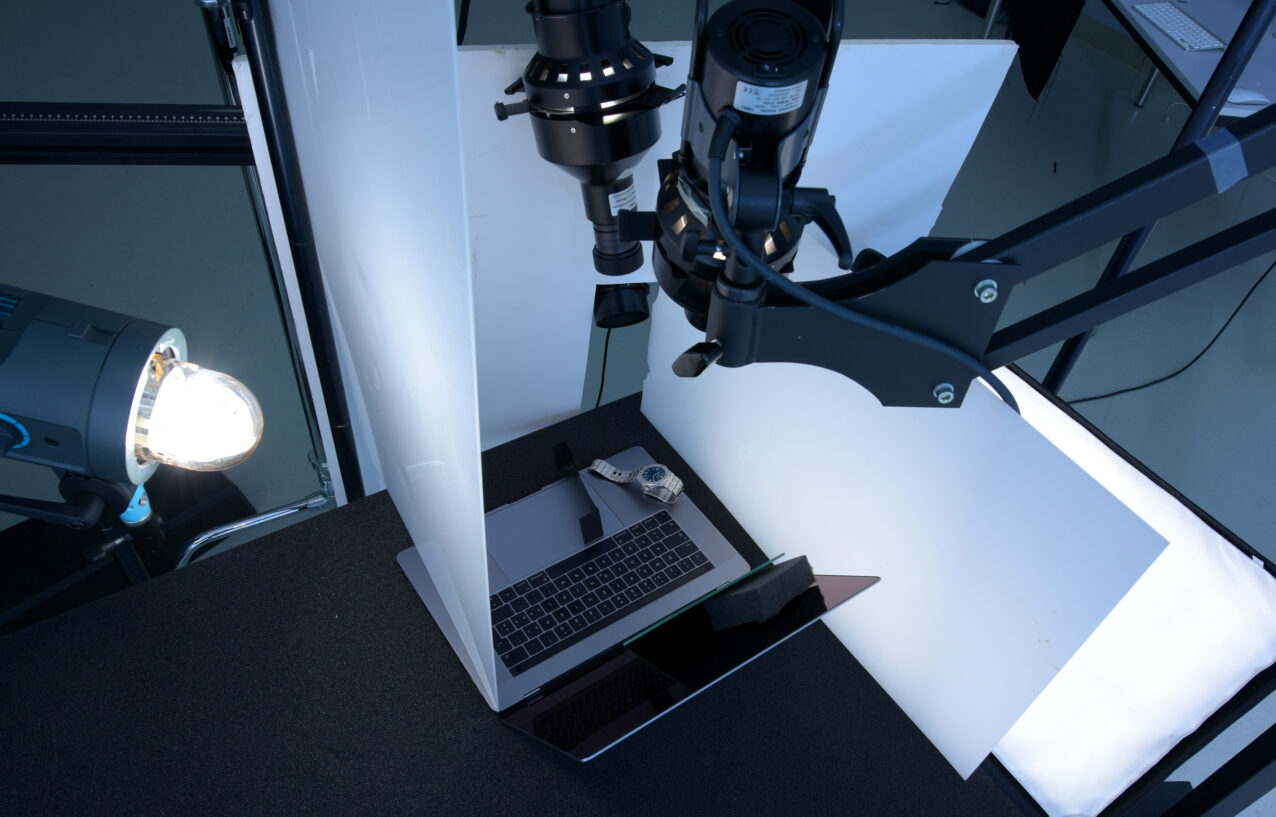
To better understand what the individual lights do, we should first have a look at the entire setup:
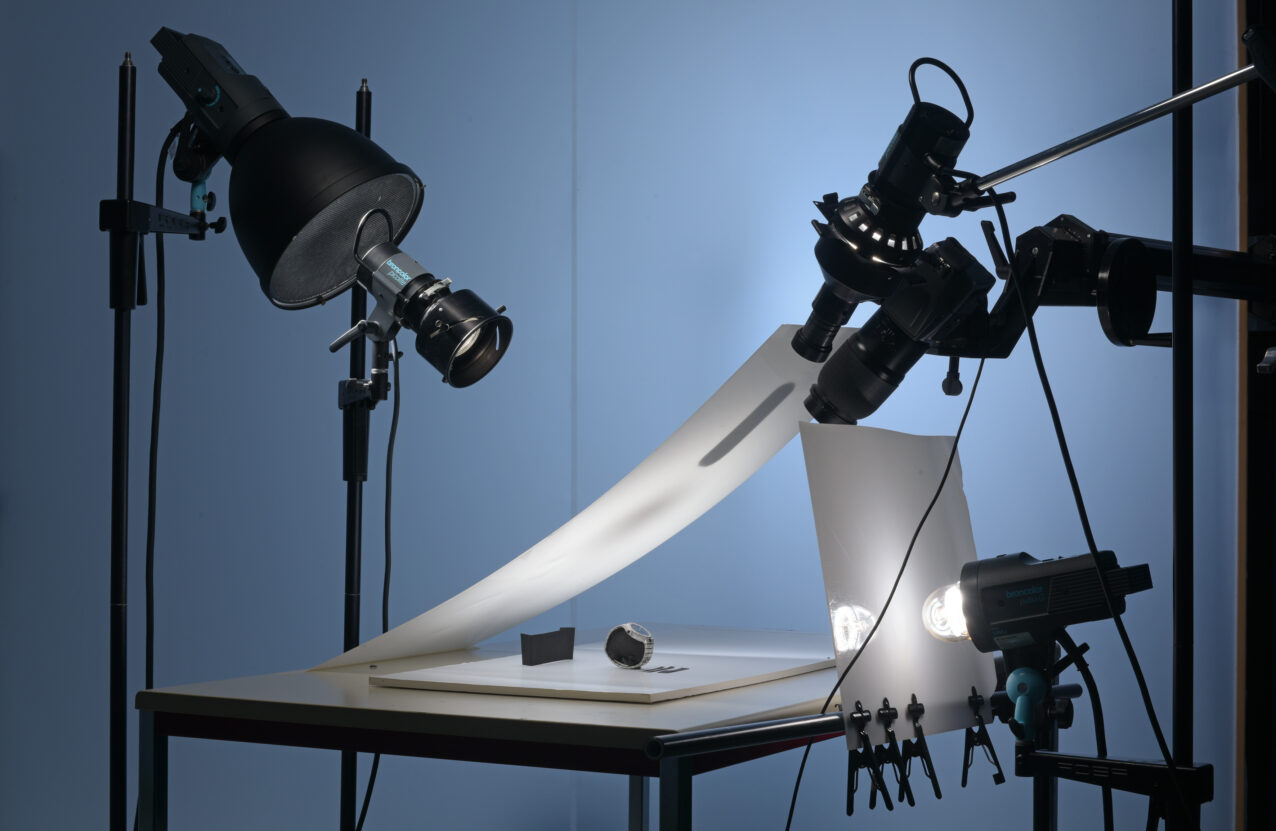
As main light, I chose a Picolite with a Fresnel Spot attachment through an acrylic diffusion panel. This light allowed a very precise and narrow illumination of the diffusor. I received nice gradations on the shiny parts and the light remained hard enough to make the texture of the brushed elements clearly visible.
It is mainly this light that is responsible for the small shadow in the final photograph:

Too many segments of the strap did not get any light at all, so I positioned a P65 with grids very close behind the Picolite to "extend" the gradation. Use a large reflector for this in order to avoid a shadow of the Picolite on the acrylic plate.
This larger illumination of the diffuser unfortunately provoked some unpleasant reflections in the glass. But as this glass is perfectly flat, a tiny black piece of paper on the acrylic solved the problem. You can easily find this mini-flag in the picture of the setup:
The lower part of the strap only reflected the evenly lit table and looked very flat and boring. The "very fast gradation" of a bare flash tube behind another acrylic diffusor brought some contrast into this area:
So far, all the light in the set up is diffused. This works perfectly on the metallic housing and strap, but the dial looks very dull and desaturated. This part needs some direct light.
To hit the dial (and only the dial!) with such an aggressive light, I used another Picolite, equipped with a projecting attachment and a narrow, round pinhole aperture:
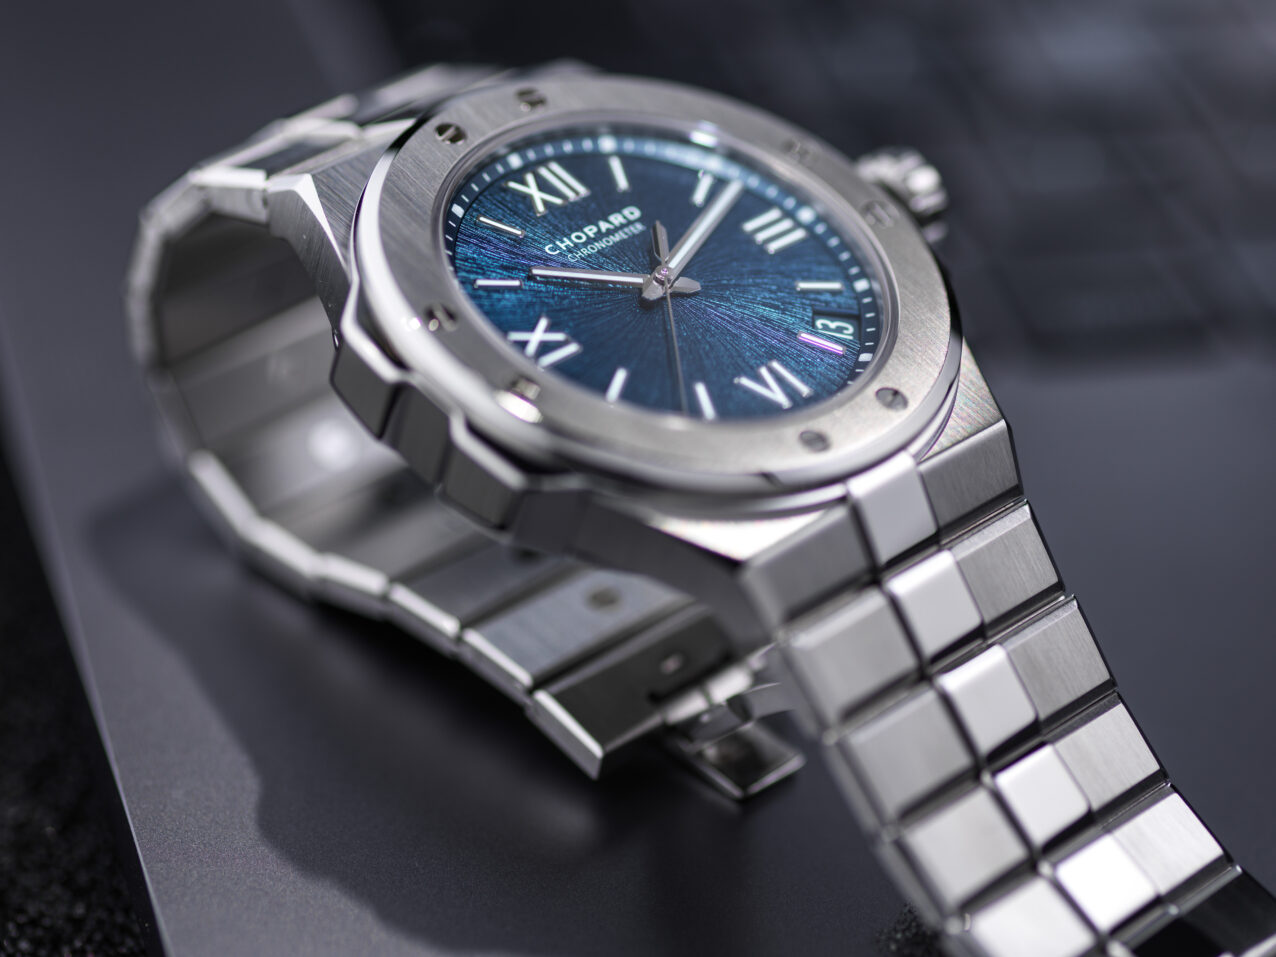
So this is what I have so far:

When shooting shiny objects on bright backgrounds, most of the time, unwanted, uncontrolled and contrast-lowering reflections will appear. To gain some extra contrast and "crispiness", I put several small back pieces of paper in front and behind the watch.
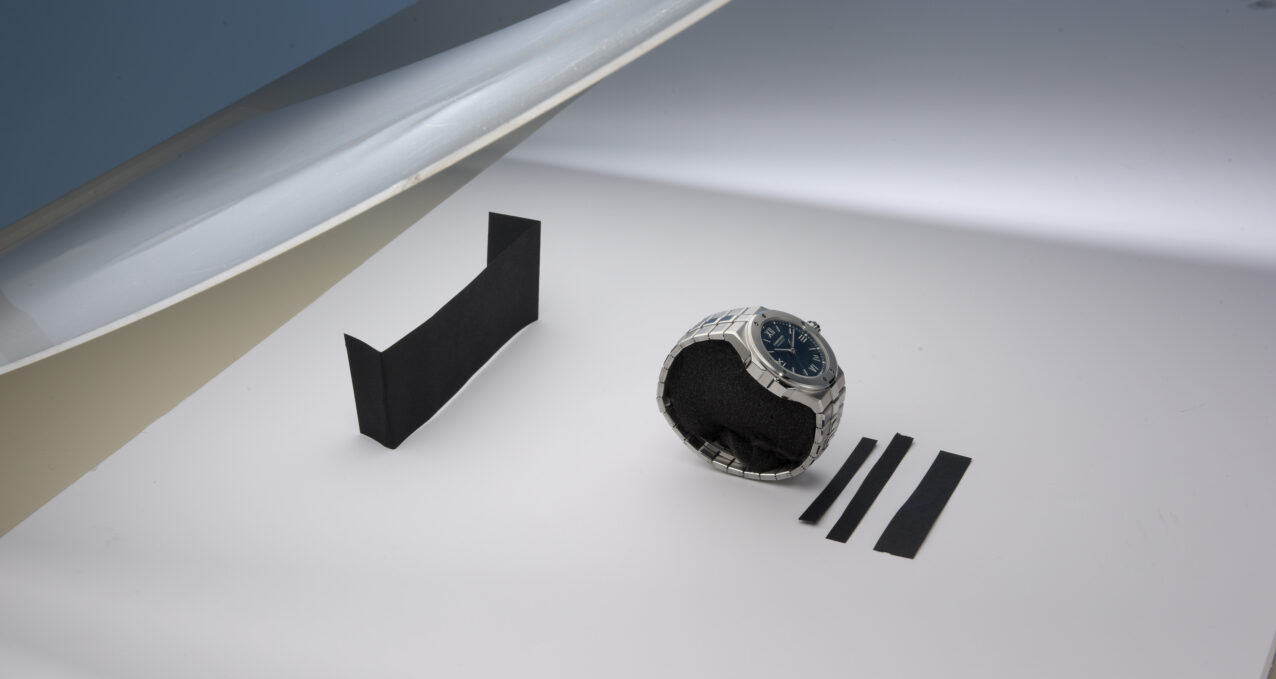
Some of these small flags had to very close to the object. So I had to take another shot of the undisturbed background and assembled the final picture in Photoshop.
I used f22 with a 120mm macro lens on a medium format camera and stitched 13 focus layers to get the high-resolution photo perfectly sharp:
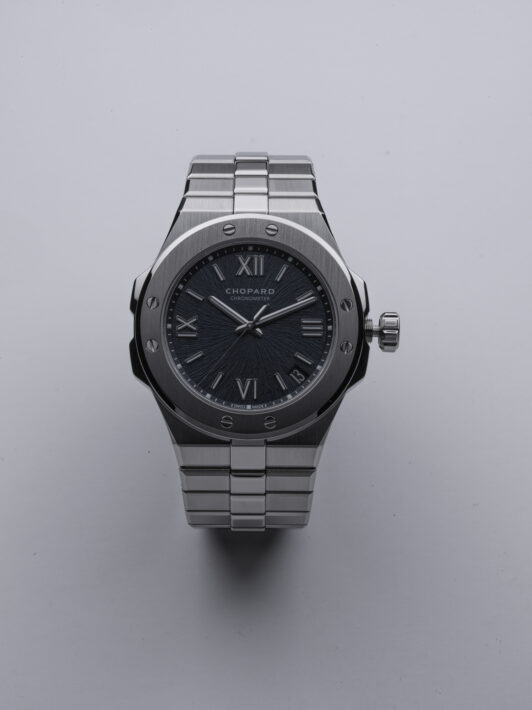
In the end, this first shot was not as simple as expected, and postproduction (new background without the black papers, dust removal and focus stacking) was time-consuming. So as my next shot I chose the photo with the selective focus, hoping this picture to be almost finished "out of the camera".
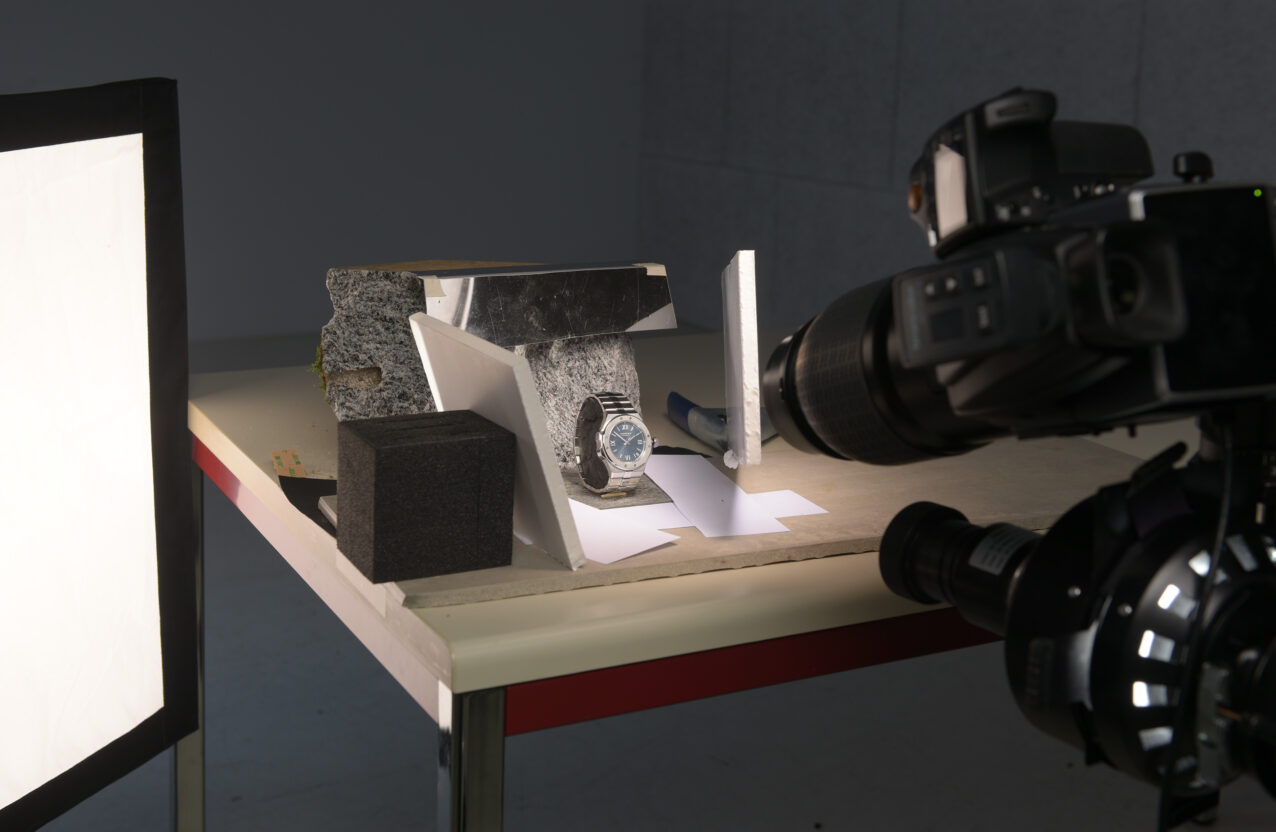
Let's have a look at the final set up first
This lighting setup is shot from behind, so the main light, that you see coming from the right, is here the bare bulb on the very left.
Here you can see, what this first light is doing:
It is the main light, shaping the strap and creating first gradations on the polished parts of the housing. The position of the acrylic plate is not very important but positioning the bare bulb behind it is very crucial and very time-consuming.
The smaller a (shiny) object, the more important this technique becomes. Bare bulbs create the fastest possible gradations that are essential in watches photography, jewelry photography and in commercial product photography in general.
With the increasing size of the objects, you might want to change to reflectors with grids to control your larger gradations better.
The fill-in light was the next step. Unlike the main light, I chose an even light source without gradation – so a small softbox of 35x60 cm illuminated the acrylic on the left with very low intensity.
A big compliment here for the broncolor Scoro 1600 S WiFi that is feeding this light: Even at the extremely low power setting of this light (I am shooting at f5,6), no color temperature shift could be detected! The neutral color of the object would immediately have shown this problem:
These two diffused lights did a good job shaping the metallic parts. But the photo was missing some punch, especially as the focus is chosen very selective.
Additionally, I wanted to create a shadow on the underground, that gives the entire shot a more three-dimensional feel.
A Picolite projection attachment (with the lens removed!) created this shadow as well as some strong but pleasant highlights:
From the first shot I remembered how to solve the problem of the dull-looking dial. Again, a very precisely aligned projecting attachment (this time with the lens and a narrow pinhole aperture) made the texture of the dial clearly visible and increased the saturation drastically.
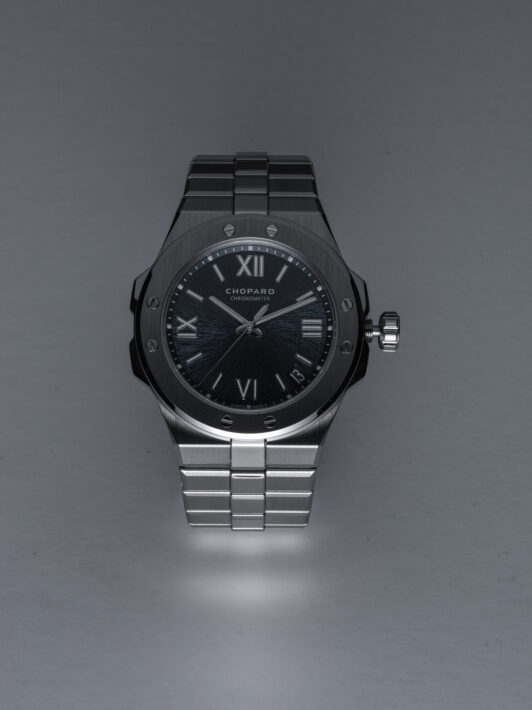
So here we go:
No focus stitching, just an (almost) perfect photograph out of the camera:
(I just needed to remove the dust and to correct the color on some parts of the dial. Chromatic aberration of my lens created some disturbing purplish color shift in the sharp areas of the dial. You can still see this effect on the previous photo.)
Never change a winning team: During the first two shootings, I learned a lot about how these light shapers interact with the watch. So, two of my beloved Picolites, a normal reflector with grids and a small softbox were used again for this last photograph; besides several mirrors, cardboards and small reflectors as always in commercial photography.
Here an overview of the entire final lighting setup:
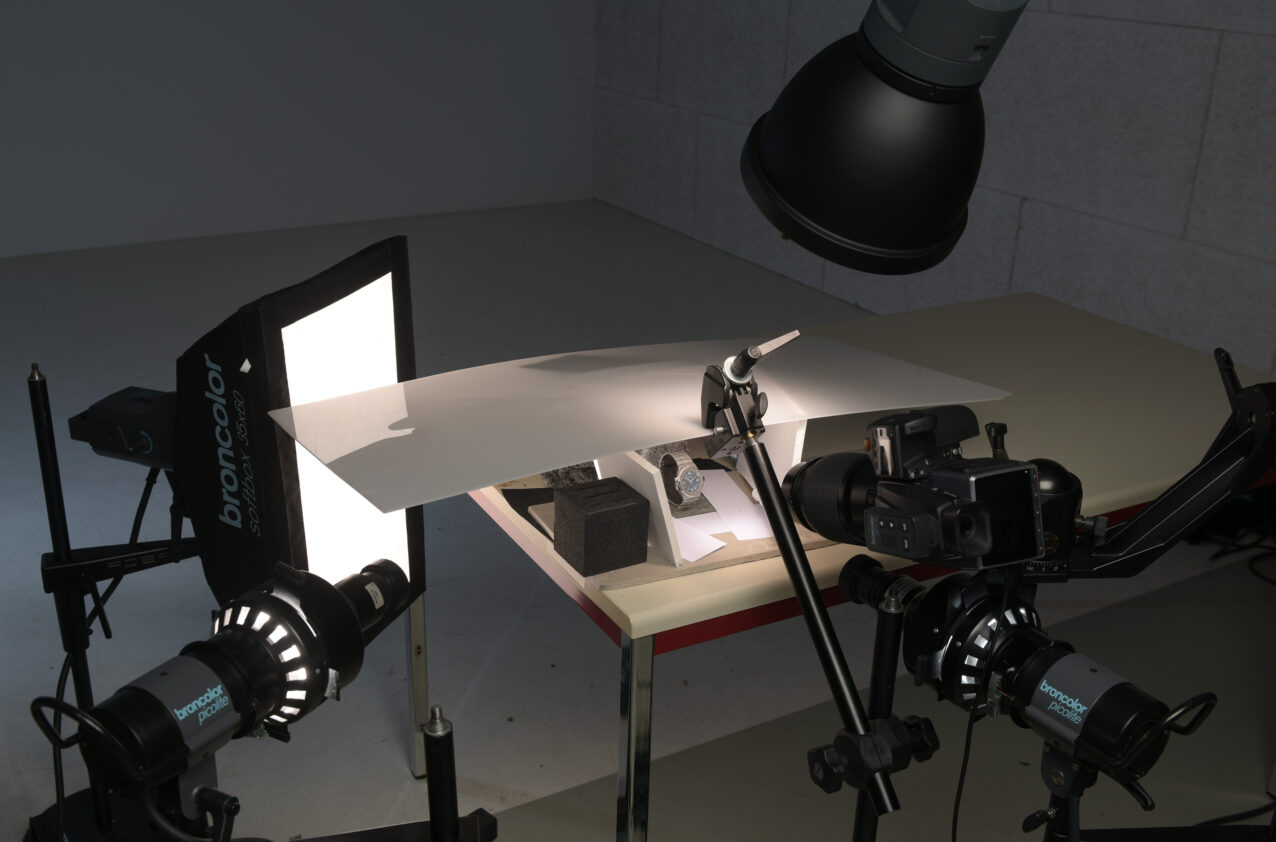
And, as the diffuser blocks most of the view, here a close up with the “roof” removed:
Let’s have a look at the “evolution” of this photograph, seeing what every single light adds to the picture.
The diffused main light was the first step again. This time I placed it somewhat lower and backlit it not with a bare bulb, but with a standard reflector and grids. This illuminated a larger area of the diffuser, covering more of the entire object. A second light (like in the first example) was therefore not necessary:
As you can see in the previous shot, the texture of the stone reflects in the strap. To clean these reflections, I placed little pieces of paper all around and in front of the watch. These, of course, had to be removed in postproduction.
Cardboards left and right of the object, recycled the top light, illuminating the shiny parts of the housing left and right.
So far, only one active light is used; three more to come:
The relatively dark parts on the top left of the strap had no clear separation from the background. So I used a small softbox as a rim light to guarantee a clean and clearly visible contour:
The next step is the same old trick: It is the projecting attachment of a Picolite that brings the dial alive and that lets the beautiful blue shine:
The polished and very shiny areas of the watch require soft and diffused studio lighting. But unfortunately this is not at all the best light to work out the texture of the rocky background.
But lucky me; I still have one more vacant Picolite available!
I fired its hard and precise light from behind the left cardboard flag on the stone, creating a lot of texture and some sparkling highlights at the same time. Thank you, Picolite! :
Behind the watch, I wanted to have a quick fall of the sharpness; I did not want to close the aperture more than to f13. This required not less than 16 exposures with different focal planes that Photoshop assembled for me in about 45 minutes.
There was an additional exposure made for the underground (without the papers) and one for the indexes that needed some additional reflections. Then the crown had to be pushed back in and the dust was removed in postproduction as well.
After all this, the last picture was finally born:
Conclusion: 3 days, 3 pictures, lots of patience, fun and good music.